
Ans. To set up your ink for the first time, turn on the printer, open the main ink access door, and wait for the carriage to center. Unpack the cartridges by peeling off the protective plastic tape, and push them firmly into their slots until you hear a clear click sound.
How to Put Ink Into a HP Printer: Step-by-Step Guide to Replacing HP Ink Cartridges
I’ve swapped out dozens of ink cartridges on my own HP printer, and I learned the hard way that doing it right is important to prevent messy leaks or permanent printhead damage. You will know your printer is running out of ink when your printed text looks faded or comes with vertical streaks.
Before starting, make sure to have a fresh HP cartridge, a lint-free cloth, and your manual. To put new ink into your printer, the common process you need to follow for HP printers is to turn on the power, open the main access door, remove the old cartridge, insert the new one until it clicks, and close the door.
While the core process is standard, some models vary slightly. In this guide, we will look at the steps for each specific type. After all, market tracking data on Statista shows HP shipped 6.6 million printing devices worldwide in a single quarter, so there are a lot of variations out there. This includes the DeskJet, ENVY, OfficeJet, and Smart Tank series, so you know how to put ink into a HP printer.
Table of Contents:
- When Should You Change Ink Cartridges in an HP Printer?
- What You'll Need Before Installing New HP Ink Cartridges?
- How to Put Ink Into a HP Printer (Step-by-Step Instructions)?
- How to Change HP Printer Ink on Popular HP Printer Series?
- How to Put in HP Ink Cartridges Without Errors?
- Common Problems After Replacing HP Ink Cartridges
- How to Change Cartridges in HP Printer Safely?
- HP Ink Cartridge Maintenance Tips for Longer Life
- Frequently Asked Questions
- Conclusion
When Should You Change Ink Cartridges in an HP Printer?
I always change my HP cartridges the second my prints look faded to avoid permanently ruining the printhead. Knowing when to swap out your ink saves you money and protects your printer from sudden damage because if you print on empty, the elements inside the printhead can overheat and burn out.
Warning Signs Your Ink Cartridge Needs Replacement
Watch for these signs that tell the printer is running out of ink:
- “Low ink” notification pops up on screen or printer dashboard
- Printout becomes faded or streaky
- Photos printed miss colors
- Printer stops and shows “printer error” messages
Can You Continue Printing with Low Ink?
Yes, you can bypass the warning and keep printing, but I highly advise not to do so.
- Waiting too long risks completely burning out your printhead since ink acts as the cooling agent.
- Your print quality will also decrease, leaving you with faded and useless documents.
- Clogged nozzles can permanently damage your printer’s overall performance.
What You’ll Need Before Installing New HP Ink Cartridges?
Before opening up your printer, always keep these things handy so that the installation goes smoothly and does not leave a stain on your desk.
- Have the exact HP cartridge model number ready
- A clean, lint-free cloth in case of any accidental ink smudge
- Lay down a protective paper to protect the workspace
- Verify the cartridge compatibility with your specific printer series
How to Find the Correct HP Ink Cartridge Number?
Don’t know where to find the HP cartridge number? Here are three ways to know the specific cartridge number:
- Printer Label Location: Look inside the cartridge access door or on the back of the machine for a printed sticker with the number.
- HP Smart App Method: Open the HP app, open your printer’s status page, locate the “Supplies” or “Ink Status” section, and view the cartridge information.
- Printer’s Digital Display: Go to the “Ink” or “Supplies” section (ink droplet icon) on the printer’s display and select “Ink Information” or “Cartridge Information.”
How to Put Ink Into a HP Printer (Step-by-Step Instructions)?
Putting new ink into your HP printer is easy when you follow the correct sequence of steps. Here’s how to put ink into a HP printer.
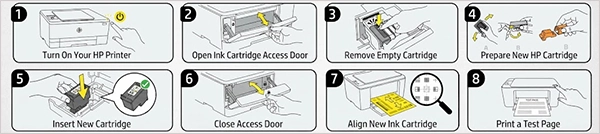
Step 1 – Turn On Your HP Printer
To start, make sure your printer is powered on and stays on throughout the process because the power signals the internal computer to unlock the mechanics. Due to this, the cartridge can automatically slide right into the center of the access area so you can reach the slots.
Step 2 – Open the Ink Cartridge Access Door
Next, open the printer’s main access panel. The door is usually on the front for DeskJet and Office Jet models, but under the scanner bed on ENVY printers. Wait for the motorised holder to come to a complete silent stop before you touch anything else.
Note: Your HP printer might have one main door or a dual-door system, depending on your specific model.
Step 3 – Remove the Empty Ink Cartridge
Gently press down on the top of the cartridge to remove the old ink. Click it out of its slot or lift the plastic latch if your specific model has one. Grip the sides firmly and pull the cartridge straight out toward you.
Be careful not to drag it roughly against the slot walls so you do not scratch the printhead contacts inside.
Step 4 – Prepare the New HP Ink Cartridge
Take the new cartridge out of the box and carefully tear away the outer plastic wrapper. Grab the brightly coloured pull-tab to peel the protective tape off the bottom. Avoid touching the gold copper contacts or the ink nozzles with your fingers because skin oil can cause clogs.
Step 5 – Insert the New Cartridge
To install the new ink, make sure you match the color cartridges correctly by placing tri-color in the left slot and black in the right slot.
Hold the cartridge by its sides and slide it into the slot at a slight upward angle. Push it forward till you hear the click sound. Now the machine can read the electronic chip.
Step 6 – Close the Access Door
Before shutting the machine, just check once the cartridge is perfectly fitted or not. Once everything looks good, finish up by closing the printer cover properly. Push the door or lower the scanner bed until it shuts completely, which will signal the printer to start its initialization cycle.
Step 7 – Align the New Ink Cartridge
After closing the door of the printer, your printer will automatically align and calibrate the new printheads.
If your printer doesn’t start this on its own, you can manually do this through the HP Smart app or the printer’s built-in touch screen menu.
Step 8 – Print a Test Page
Finally, it’s time to print a test page to check everything is working perfectly. Check the printed sheet; all the colours are vibrant, text is sharp, and no blank streaks appear across the page.
How to Change HP Printer Ink on Popular HP Printer Series?
The core mechanical concept remains the same across the brand; the physical layout changes depending on your printer model. Let’s see “how to change an ink cartridge in a printer” process differs by model.
How to Change Ink Cartridge in HP DeskJet Printers?
You will find a drop-down plastic flap located behind the paper output tray at the front of the printer. While the older legacy DeskJets might require lifting the main top scanner cover to find the ink, in the modern ones, you will find it at the front.
- Turn the printer on and open the ink cartridge access door.
- Wait a few seconds until the ink cartridge stops moving, then gently press down the top edge of the ink cartridge, then slide it out.
- Unpack the genuine HP cartridge and touch only the black solid plastic frame and peel away the protective tape.
- Push it into the empty slot until it snaps securely into place, then close the door.
DeskJet models have two cartridge carriage systems: tri-color on the left side and black on the right side. You will not find any extra locking levers or latches in this series.
How to Change Ink Cartridge in HP OfficeJet Printers?
OfficeJet models have independent slots instead of the combined multi-color units. There’s a two-stage door configuration.
- Turn the printer on, open the front door first, and then lift the cartridge access door.
- Wait until the ink carriage slides to the center and comes to a silent stop.
- Push the front latch of the ink cartridge to release the lock, then hold it by the side and pull it out.
- Unpack your new cartridge and pull off the orange plastic wrap and twist off the protective orange cap.
Note: Remember to match the color on the cartridge with the color on the printhead. - Slide the new one into its color-coded slot and gently push it to fit it into its place, then shut both doors.
The moment you close the access panel, the printer automatically executes a calibration routine. This automatic alignment feature in the HP OfficeJet printers guarantees sharp text prints.
How to Change Ink in HP ENVY Printers?
This series has a spring-loaded slot design within a dual-carriage frame. The process remains the same, just a variation in how to put in HP ink cartridges. Also, you will not find any front door on this series. Instead, you must open the main cartridge access door by lifting the entire upper scanner glass bed upward until it clicks and holds itself in place.
- Turn the printer on and lift the scanner deck open.
- Wait for the holder to stop moving.
- Lightly press down on the cartridge to click it out of its locked position and pull it out.
- Remove the new cartridge from its packing. Touch only the plastic black frame.
- Slide it into the slot at a slightly upward angle, push it, and it will get placed in its position.
HP Smart Tank Printers: How Ink Refilling Differs
Smart tank printers are completely different because they do not use plastic in cartridges at all. Instead, they use built-in tanks that you fill up yourself.
To help you see the difference between these two systems, here is a quick look.
| Ink Bottles | Ink Cartridges |
| Pour ink liquid into built-in tanks | Place a plastic block in ink cartridges |
| Massive ink volume (lasts thousands of pages) | Low ink volume (lasts a few hundred pages) |
| Extremely cheap | Expensive |
| Best for daily printing | Best for occasional printing |
Because you have to pour liquid ink here, following a few basic precautions will help you.
- Watch the lines: Keep your eyes on the clear plastic window in the front of the printer. Stop pouring before the ink passes the maximum fill line.
- Do not squeeze: Let the bottle drain into the tank on its own. Squeezing it will spill the ink everywhere.
- Plug the tank caps tight: After refilling, make sure to push the rubber tank caps back on firmly.
When you are ready to fill your HP Smart Tank printers, follow these steps:
- Open the main door on the front to see the ink tanks.
- Pull the rubber cap off the specific color tank you want to fill up.
- Twist the cap of your new HP ink bottle. Flip it upside down and push it into the tank opening. Let the ink flow until the tank is full.
- Pull the bottle away and press the rubber plug back in tightly. Finally, close the printer door.
Fun Fact: HP does not just print on paper. Their industrial 3D printers actually make real metal car parts.
How to Put in HP Ink Cartridges Without Errors?
Don’t be discouraged if your printer doesn’t recognize the new ink on the first try. I struggled with error messages when I first started out, too. To help you, I have put together a quick checklist of things you should make sure to check while putting in HP ink cartridges.
Make Sure the Cartridge Is Compatible
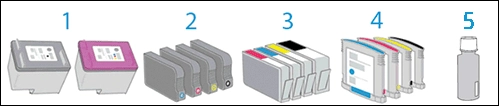
Always verify that the cartridge model number matches your printer before trying to install it. HP sells cartridges that look physically identical but carry different internal electronic chips.
- Cross-check your printer model with the compatibility list on the packaging.
- Match the digital codes of your old cartridge with the new ones.
Remove All Protective Packaging
Do not forget to remove even the tiny piece of plastic wrap from the cartridge, as any piece left can block the internal sensors.
Note: While unpacking the new ink cartridge, do not touch the copper contacts.
Install Color and Black Cartridges in Correct Slots
Accidentally swapping the slots will cause configuration errors.
- Insert the tri-color cartridge into the left slot.
- Insert the black cartridge into the right slot.
Wait for Printer Recognition
Once you put everything in place and close the door, let the machine complete the processing cycle without interruption. Wait until all the internal whirring and clicking noises stop completely.
Common Problems After Replacing HP Ink Cartridges
This is the troubleshooting section that lists the most common post-installation errors such as unread cartridges, poor print quality, and false low-ink readings with the quick fixes.
Printer Does Not Recognize New Cartridge
If your printer didn’t recognize the new ink, it’s because of a connection error. Try these solutions:
- Reinstall the Cartridge: Take it out and double-check the protective tape is fully removed. Now gently put it back.
- Clean Cartridge Contacts: Wipe the gold copper contacts gently with a lint-free cloth.
- Restart the Printer: Turn the printer off and power it on for a fresh hardware scan after 60 seconds.
HP Printer Still Says Low Ink
If your screen shows that your brand new full ink is empty, this might just be an internal memory cache.
- Firmware Delays: Give the system a few minutes or print a trial page to force the dashboard level to refresh.
- Cartridge Authentication: Click “OK” or “Continue” on any computer pop-ups to authenticate the cartridge and continue.
Poor Print Quality After Installation
Faded lines or missing text in printouts right after an ink swap means it hasn’t properly settled into the nozzles yet.
- Run Printhead Cleaning: Trigger an automated cleaning cycle through the front panel, embedded web server, or from the HP utility (Windows only) to clear out the trapped air pockets.
Note: Cleaning uses ink, so clean the printhead only when necessary. - Perform Alignment: Scan your alignment page to calibrate the internal sensors for crisp text.
- Print Diagnostic Page: Check the diagnostic sheet to pinpoint exactly which color nozzles are not working properly.
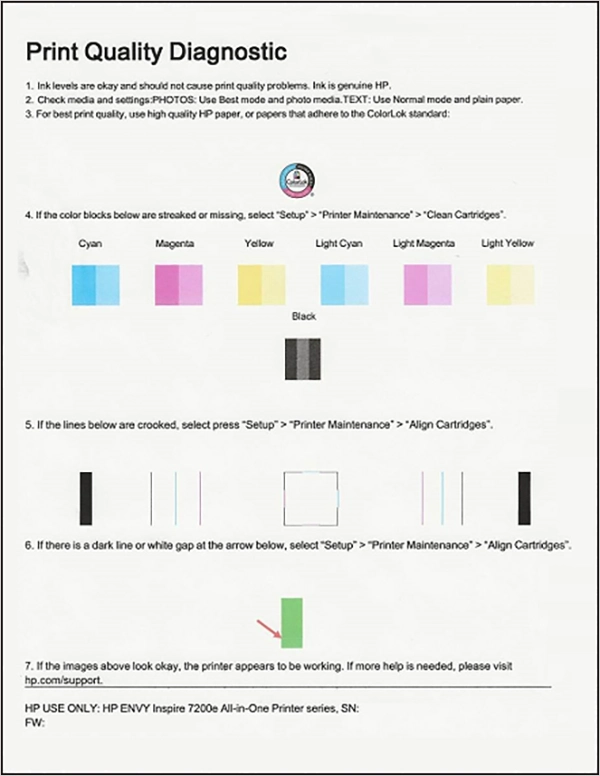
Ink Cartridge Error Message Appears
Error messages on screen are mostly because of software misunderstanding or a compatibility issue.
| Causes | Fixes |
| Dust blocking the gold connection chips | Clean the contacts |
| Cartridge is not fully clicked into the slot | Take the cartridge out and place it back in |
| The printer’s software needs an update | Update the printer’s software |
Using third-party or refilled cartridges can trigger the error messages due to HP’s built-in security system. The third-party options can save you cost, but they may produce lower quality prints with blurred lines, overspray, reduced sharpness, and faded prints.
How to Change Cartridges in HP Printer Safely?
Now let’s see how to change cartridges in HP printer so that you don’t face messy ink leaks or damage the printhead in any way. Follow the instructions below to set your printer cartridge in one go.
Mistakes to Avoid During Installation
You might overlook the small details, but avoiding these mistakes will protect your prints and keep your printer running perfectly, saving you from ever needing a professional HP printer repair:
- Touching the delicate print nozzles with bare fingers can lead to blockage or reading failures.
- Cartridges are designed to glide in. If you have to push with heavy force, it can disturb the alignment of the printhead.
- Always double-check your cartridge box because installing the wrong cartridge model will lock your printer until it is removed.
- Leaving the clear safety tape attached will block the inflow.
Proper Storage of Spare Ink Cartridges
You can stock up on extra ink to avoid running out mid-project, but cartridges dry out if they are not stored correctly. Here’s the proper way to store spare ink cartridges.
- Always store your spare ink in a cool and dark place between 0°C and 35°C (32°F to 95°F) in their original sealed packaging until installation.
- Do not open the protective plastic wrapper until you are ready to install the cartridge because once it is exposed to air, the nozzles will dry immediately.
Tip: Always keep the packaging with the print nozzles pointing downward or sideways.
HP Ink Cartridge Maintenance Tips for Longer Life
Ink cartridges can dry out or get clogged even before they actually run out of ink. This is because of the long idle printer period, poor maintenance of software and hardware, and third-party inks. Practicing proper printer maintenance is the best way to extend your hardware lifecycles. Use the following methods to keep your ink cartridges longer.
Print Regularly to Prevent Clogging
Leaving your printer sitting unused for weeks is the number one reason ink dries out and clogs up the nozzles.
Make it a habit to print at least one page every week to keep nozzles clear and ink flowing.
Keep Printer Firmware Updated
It is easy to click “remind me later” on software updates, but do you know that outdated printer firmware can cause real issues with how your printer manages ink consumption?
Turn on automatic updates in your HP Smart app settings to prevent the situation where you are stuck because of software updates.
Use Genuine HP Ink Cartridges
Cheap third-party cartridges are easy to get, but they frequently end up costing more in ruined prints.
Only use genuine HP ink cartridges because they are chemically balanced to withstand the exact heat settings of your printer model, keeping your printer and prints perfect.
Run Maintenance Cycles When Needed
Use the printer’s built-in “Clean Printhead” function beforehand, not only after you notice poor print or any issue. Don’t overdo this, as it will only waste ink.
Frequently Asked Questions
How do I put ink into an HP printer for the first time?
How do I change HP printer ink cartridges?
Ans. To change HP printer ink cartridges, turn your printer on and open the front access door so the carrier slides to the middle. Press down on the old cartridge to release it and pull it out. Take the new cartridge and remove the tape. Slide it into the cartridge slot and then close the door.
Can I replace only one HP ink cartridge at a time?
Ans. Yes, you can replace only one ink cartridge at a time. If your black ink is empty but your color ink is still fine, or vice versa, you can just replace the one. The printer will keep running normally with the other old cartridge still inside.
Why won’t my HP printer recognize a new cartridge?
Ans. HP printer might reject a new cartridge due to these common issues:
- Protective plastic tape still covers the ink nozzles.
- Dust or fingerprint oils block the electronic strips
- Incorrect cartridge
- The unit did not fit properly in the slot
- Third-party cartridges
Do HP printers require cartridge alignment after replacement?
Ans. Yes, but how it happens depends on your specific printer model.
- Automatic Alignment: Advanced series like HP ENVY, OfficeJet, and Smart Tank calibrate themselves automatically the moment you shut the ink down.
- Manual Alignment: Entry-level models like the HP DeskJet require you to manually place the printed alignment page face down on the scanner glass and press the “Copy” button to finish calibration.
How long do HP ink cartridges last?
Ans. Unopened HP ink cartridges last 18 to 24 months on the shelf. Once you install them inside your printer, they will stay fresh for 3 to 6 months before sitting idle causes the ink to dry out.
Can I use compatible or third-party HP ink cartridges?
Ans. It is not advised to use compatible or third-party HP ink cartridges because HP uses automated security software that updates over the internet and blocks off-brand ink chips.
What should I do if ink smears after installing a new cartridge?
Ans. If ink smears after installing a new cartridge and your prints look smudged or blurry, it means excess ink or dust is blocking the print nozzles. To fix this, open your printer settings menu and select the “Clean Printhead” to run an automated cleaning cycle.
Conclusion
In summary, the HP ink replacement process comes down to safe physical installation and regular maintenance. Just turn the printer on, open the access door, and wait for the carriage to stop in the center. Pop the old unit out and slide the new one at an angle until it clicks. Doing this carefully protects the internal parts from messy leaks and breakdowns.
To keep your printer inks working, print one page a week so the nozzles never dry out. Most importantly, always check your printer model number before buying new ink so that you don’t get stuck with an incompatible cartridge.
Sources:
HP DeskJet 3700 Printers – Replacing ink cartridges – HP Support
HP Smart Tank 500, 600 – Refill the ink tanks – HP Support
Clean the printhead – HP Support
How Long Does Printer Ink Last If You Don’t Print Often? – HP Tech Takes